
3D-Printed Drill Templates, Jigs and Fixtures in SLS Nylon: A Practical Design Guide
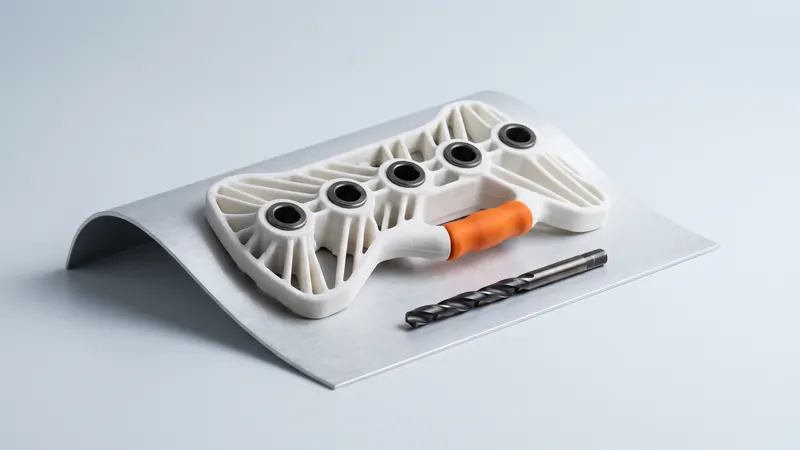
Every workshop and production line needs small helpers: drill templates that put holes in the right place, fixtures that hold parts during assembly, nests that position a component for inspection. Traditionally they are milled from aluminum or plastic plate. SLS 3D printing in PA 12 nylon is a fast, robust alternative for many of them. This guide explains where printed jigs and fixtures work, where they need steel, and how to design them.
Why SLS suits jigs and fixtures
- Free-form contact surfaces. A fixture can follow the exact contour of a cast, molded or curved part. In SLS, a contour nest costs no more than a flat one, because the price depends on volume and size, not on complexity.
- No supports, no tooling. Internal channels, undercuts, clips and handles are printed in one piece.
- Tough material. PA 12 is impact resistant and does not shatter when dropped. It resists oils, greases and many workshop fluids.
- Light weight. A nylon template is far lighter than an aluminum one, which matters when it is placed hundreds of times per shift.
- Fast iteration. When the product changes, you update the CAD model and order a new version without reprogramming a machine.
- Color coding. We dye in 61 colors, all priced instantly in the calculator. Our parts come out of the printer bright white, so dyed colors stay clear and easy to tell apart.
What printed jigs and fixtures are used for
| Tool | Typical use | SLS suitability |
|---|---|---|
| Drill template | Position holes on panels, profiles, castings or furniture parts | Very good, with steel drill bushings for repeated use |
| Assembly fixture | Hold several parts in position for gluing, screwing or riveting | Very good |
| Locating nest | Position a part for marking, labeling or inspection | Very good |
| Go / no-go check gauge | Quick check of shape and hole pattern | Good for coarse checks; not a replacement for calibrated gauges |
| Soft jaws and protective pads | Hold delicate parts in a vise or clamp without marking them | Good |
| Masking fixtures | Cover areas during painting, blasting or bonding | Good; check chemical compatibility |
| Cable and hose guides | Hold harnesses during assembly | Very good |
Designing an SLS drill template
1. Locate the template on the workpiece
A drill template is only as accurate as its location. Common strategies:
- Contour fit: the template is the negative of the workpiece surface, so it sits in one position only. Ideal for curved or cast parts.
- Reference edges: stops that rest against machined edges of the workpiece, following the 3-2-1 principle.
- Locating pins: printed or inserted pins that engage existing holes.
Leave a small clearance between the template and the workpiece surface so that the surface texture and the print tolerance do not make the template rock.
2. Printed holes or drill bushings?
For a handful of holes, a pilot drill or a marking-only template, printed guide holes in PA 12 are enough. For repeated drilling, the drill wears and heats the nylon bore and accuracy degrades. The standard solution is to press hardened steel drill bushings into the printed body. Standard bushings, for example to DIN 179 without collar or DIN 172 with collar, are inexpensive and give a hard, accurate guide; the nylon provides the shape, location and clamping.
How the bushing seat is sized, how much material it needs around it and how long the bushing should be depend on the drill diameter, the forces and the number of cycles. These are design decisions for your application rather than fixed rules: if you want a second opinion, the specialists at prototype.builders can review the design intent with you.
3. Hold it in place
Movement during drilling is the most common cause of misplaced holes. Options:
- Integrated lugs or slots for toggle clamps.
- Pockets for magnets on steel workpieces.
- Mounting points for suction cups or vacuum pads on large panels.
- Printed snap-on clips for profiles.
4. Add handles, labels and orientation features
- Ergonomic handles or finger recesses.
- Embossed or engraved text: part number, side, revision.
- Poka-yoke features: asymmetric pins or shapes that prevent the template from being used the wrong way round.
5. Keep it stiff and light
Drill templates often span large areas. Thick solid plates use a lot of material and are more likely to warp during cooling. A thinner plate with ribs, or a frame structure, is stiffer per gram and cheaper.
6. Respect the chamber size
Our EOS FORMIGA P 110 Velocis has a chamber of 200 × 250 × 330 mm. Larger templates can be split into sections joined with dovetails, locating pins or screws. Keep joints away from critical holes, or locate each section on the workpiece independently.
Accuracy you can expect
The general tolerance for laser-sintered PA 12 is ±0.3 % of the dimension, with a lower limit of ±0.3 mm. On a template 200 mm long, hole positions can therefore deviate by up to about ±0.6 mm from nominal. That is enough for many assembly, furniture and sheet-metal applications. If your hole pattern needs tighter positions:
- Locate the template on features close to the critical holes, so the error does not add up over the length.
- Ream the bushing seats after printing, using a reference fixture.
- Print a first article, measure it and correct the CAD model before ordering more.
- For metal-grade precision, combine a printed body with machined inserts.
More in the guide to SLS tolerances and clearances.
Material limits to keep in mind
- Heat. PA 12 softens far below metals. EOS gives a heat deflection temperature for PA 2200 of 64 °C at 1.80 MPa load (157 °C at 0.45 MPa). Friction from a drill in a plain nylon bore heats it locally, another reason for steel bushings.
- Creep. Nylon slowly deforms under permanent load. Avoid printed features that stay clamped under high force.
- Wear. Sliding contact with sharp or abrasive parts wears nylon; use steel inserts at wear points.
- Moisture. PA 12 absorbs much less water than PA 6, one reason it keeps its dimensions in a workshop. See the PA12 nylon guide.
From CAD model to fixture in a few days
- Import the CAD model of the workpiece.
- Create a plate or block over the area to be drilled and subtract the workpiece with a small offset to get the contour.
- Add bushing seats, locating features, clamps, handles and labels.
- Shell or rib the body to reduce material and warping.
- Export as STEP or STL and upload it to the instant SLS calculator: the 3D viewer and design review notes show the part, whether it fits the printer's chamber and enclosed cavities.
- Choose color and delivery level, order, and press in the bushings when the parts arrive.
What drives the price of such a part is explained in How much does SLS 3D printing cost; all 61 shades are in the color catalog.
Frequently asked questions
Can a 3D-printed drill template be used in production?
Yes, if it is designed for it. For repeated drilling, press hardened steel drill bushings into the printed PA 12 body. The nylon provides the shape, location and clamping; the steel bushing guides the drill and takes the wear.
How accurate is an SLS drill template?
The general tolerance for laser-sintered PA 12 is ±0.3 % of the dimension, with a lower limit of ±0.3 mm. For tighter hole positions, locate the template close to the critical holes, ream the bushing seats or measure a first article and correct the model.
Which material is best for 3D-printed jigs and fixtures?
SLS-printed PA 12 nylon is a common choice: it is tough, light, impact resistant and resistant to oils and greases, and complex contours need no supports. For high heat or heavy wear, add steel inserts or choose another process.
How large can an SLS fixture be?
The chamber of our EOS FORMIGA P 110 Velocis measures 200 × 250 × 330 mm. Larger fixtures are split into several printed sections joined with dovetails, pins or screws.
Do I need steel drill bushings?
For marking, pilot holes or a few holes, a printed hole is often enough. For repeated drilling, or when hole positions must stay accurate over many cycles, use steel drill bushings.
Can SLS fixtures be color-coded?
Yes. Parts are white by default and can be dyed in any of 61 colors, all priced instantly, so fixtures can be coded by line, product or variant.
Get an instant price
Upload STEP or STL files to the calculator and see the price of your parts in seconds: white Nylon PA 12, blasting and polishing included, optional dyeing in 61 colors, three delivery speeds. From there you send the order preview for confirmation.
Another material, an NDA or a large series? Write to us. For design help and prototype development see prototype.builders.
Get an instant price