
Snap-Fit Joints in SLS PA 12: Design Rules That Survive Assembly
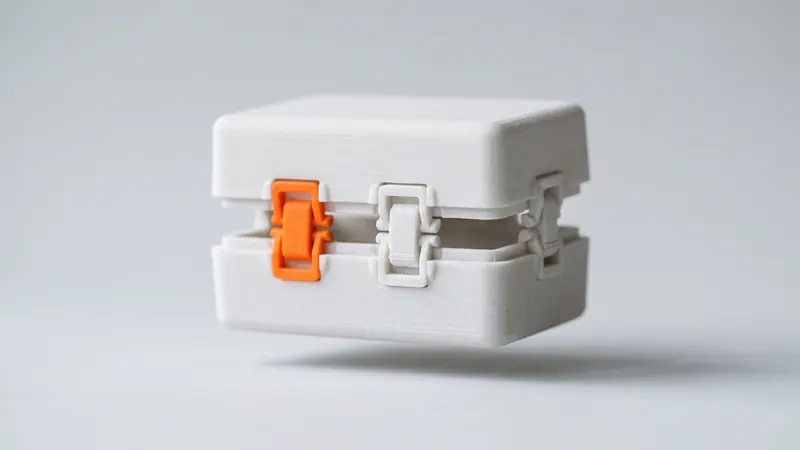
Snap-fits join parts without screws, tools or adhesive, and laser-sintered PA 12 is one of the few 3D printing materials tough enough to make them work repeatedly. Whether a clip clicks or cracks is decided by a few numbers: how far the beam bends, how thick it is at the root and in which direction it lies in the printer. This guide shows how to get them right.
Why SLS nylon suits snap-fits
A snap-fit works by bending a flexible feature out of the way during assembly and letting it spring back behind a catch. The material must stretch without breaking and recover its shape. PA 12 does both reasonably well: for PA 2200, EOS gives an elongation at break of 18 % within the layer plane and a tensile strength of 48 MPa. Many resin and filament parts are either more brittle or much weaker between layers, which is why snap-fits are a classic application for SLS.
The same EOS data contains the most important warning: across the layers the elongation at break drops to 4 % and the tensile strength to 42 MPa. A clip that bends across the layers can fail at a fraction of the deflection it survives in the layer plane.
Types of snap-fit joints
| Type | How it works | Typical use |
|---|---|---|
| Cantilever | A beam with a hook bends and catches behind an edge | Housing lids, battery covers, panel clips |
| Annular | A ring-shaped bead expands over a groove | Caps, round covers, ball joints |
| Torsional | A lever twists around a small shaft | Releasable latches, push-buttons |
| U-shaped cantilever | A folded beam that is longer in a small space | Compact clips with more deflection |
Cantilever snap-fits are the most common and the easiest to calculate, so the rest of this guide focuses on them.
The key number: strain at the root
When a cantilever bends, the material at its root stretches the most. If that strain exceeds what the material tolerates, the beam cracks or stays permanently bent. For a straight beam of constant rectangular section, the classic estimate from snap-fit design handbooks is:
strain ε = 1.5 × t × y ÷ L²
- t = thickness of the beam at the root, in the bending direction
- y = deflection needed to clear the catch (the hook depth)
- L = length of the beam from root to hook
The formula shows the levers you have: strain grows with thickness and deflection, and falls with the square of the length. Doubling the length cuts the strain to a quarter.
| Beam (t × L) | Hook depth y | Strain at root |
|---|---|---|
| 1.5 mm × 10 mm | 1.0 mm | 2.25 % |
| 1.5 mm × 15 mm | 1.0 mm | 1.0 % |
| 2.0 mm × 15 mm | 1.0 mm | 1.33 % |
| 1.5 mm × 20 mm | 1.5 mm | 0.84 % |
| 2.0 mm × 10 mm | 1.5 mm | 4.5 % |
How much strain is acceptable?
Elongation at break is the limit at which a test bar breaks, not a design value. A common practice is to stay at a fraction of it, lower still for clips that are snapped many times. Keep the calculated strain well below the 18 % that EOS gives for the layer plane, and remember that sharp corners, the powder surface and the layer direction reduce the real margin. The only reliable answer for a specific clip is a test part: with an instant price, printing two or three variants of a clip costs little.
Design rules for cantilever snap-fits
- Round the root. A sharp inside corner concentrates stress and is where most clips break. A fillet at the root, roughly half the beam thickness, makes a large difference.
- Taper the beam. A beam that gets thinner toward the hook spreads the strain more evenly; tapering the thickness to about half at the tip lowers the root strain noticeably for the same deflection.
- Make it longer, not thinner. Length reduces strain by the square, thickness only linearly. A beam thinner than about 1 mm is fragile during unpacking and blasting.
- Choose the hook angles. An insertion face of about 30° makes assembly easy. A retention face of 90° gives a permanent joint; an angle of about 45° allows the parts to be pulled apart again.
- Allow for tolerance. The general tolerance of ±0.3 %, with a lower limit of ±0.3 mm, applies to hook and catch. Design the catch so that the joint still holds at the lower end of the hook depth and still assembles at the upper end. See SLS tolerances and clearances.
- Leave room to bend. The beam needs free space behind it at least as large as the hook depth, plus clearance. Without it, the beam is forced into a sharper bend at the root.
- Add a stop. A rib that limits how far the beam can bend protects it from being overstretched when someone presses too hard.
- Do not rely on the clip for load. Snap-fits position and hold parts. Transfer large forces through ribs, pins or bosses and let the clip only keep the parts together.
Orientation: the rule that decides
Because elongation at break is 18 % in the layer plane and 4 % across the layers, the beam must bend within the layer plane. In practice: the length of the beam and its bending direction should both lie horizontally in the printer. A clip that stands upright and bends across the layers works only for very small deflections.
In the calculator you can set the layer plane per part (XY, XZ or YZ). Choose the plane in which your clips bend, and if a part has clips in several directions, consider making the clips separate parts or mention it when you send the order.
Annular and torsional snap-fits
Annular snap-fits, such as a cap that pops over a bead, stretch the whole circumference at once. The deformation is shared by the entire ring, but the ring cannot bend away, so the bead must be shallow and the walls flexible. Slots in the ring turn it into several short cantilevers and make assembly much easier.
Torsional snap-fits twist a lever around a short shaft. The shear strain in the shaft is what limits them; a longer shaft spreads it out. Both types follow the same principles: generous fillets, a test part and attention to orientation.
Finishing, dyeing and repeated use
All our parts are glass-bead blasted and polished in a DyeMansion Powershot DUAL. According to DyeMansion, this surfacing compacts the surface rather than removing material, so the hook geometry is retained; edges are rounded slightly, which makes insertion smoother. TCN liquid dyes color the surface layer without adding a coating, so a dyed clip has the same dimensions as a white one.
Nylon relaxes slowly under constant stress. A clip that is permanently bent, for example a pre-loaded latch, loses some of its force over time. Design clips so that they return to their unstressed shape once assembled.
Checklist
- Calculated root strain well below the elongation at break, lower for clips used often.
- Fillet at the root, roughly half the beam thickness.
- Beam bends in the layer plane.
- Beam thickness at least about 1 mm; long rather than thin.
- Insertion face about 30°, retention face chosen for permanent or releasable.
- Tolerance of ±0.3 mm considered on hook and catch.
- Free space and a stop behind the beam.
- Test part printed before the series.
Snap-fits are one part of a housing design; the SLS design guidelines cover walls, holes and escape holes, and threads and heat-set inserts cover screwed joints. Material data is in the PA12 nylon guide. For a joint that must survive many cycles or high loads, the specialists at prototype.builders can review the design intent and test variants with you.
Upload the parts to the instant SLS calculator to see what the test variants cost.
Frequently asked questions
Can SLS nylon be used for snap-fits?
Yes. Laser-sintered PA 12 is tough and stretches before it breaks; for PA 2200, EOS gives an elongation at break of 18 % in the layer plane. That makes it one of the best 3D printing materials for snap-fit joints.
How do I calculate a snap-fit for 3D printing?
For a straight cantilever of constant rectangular section, the strain at the root is about 1.5 x thickness x deflection divided by length squared. Keep that strain well below the elongation at break of the material and confirm with a test part.
Why did my 3D-printed snap-fit break?
The most common causes are a sharp corner at the root, a beam that is too short or thick for the deflection, and a beam that bends across the layers, where PA 2200 stretches only 4 % before breaking instead of 18 %.
Which orientation is best for snap-fits in SLS?
The beam should bend within the layer plane, with its length and bending direction horizontal in the printer. You can choose the layer plane per part in the calculator.
Do blasting or dyeing change a snap-fit?
Hardly. According to DyeMansion, the blasting and polishing compact the surface rather than removing material, and TCN dyes color the surface layer without a coating. Edges are rounded slightly.
How many times can an SLS snap-fit be assembled?
That depends on the strain in the beam. A clip designed with a low root strain, a fillet and the right orientation can be snapped many times; a clip near its strain limit may survive only a few. Test the actual design.
Get an instant price
Upload STEP or STL files to the calculator and see the price of your parts in seconds: white Nylon PA 12, blasting and polishing included, optional dyeing in 61 colors, three delivery speeds. From there you send the order preview for confirmation.
Another material, an NDA or a large series? Write to us. For design help and prototype development see prototype.builders.
Get an instant price