
Threads and Threaded Inserts in SLS Nylon: Printed, Tapped or Heat-Set?
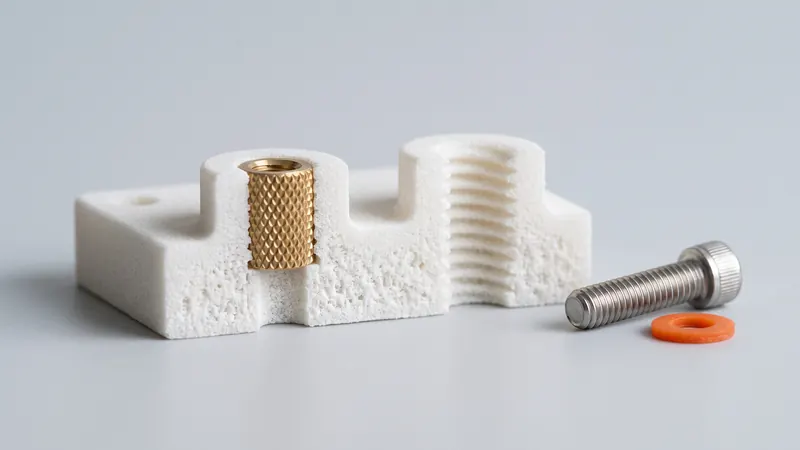
Almost every functional part is screwed to something. In laser-sintered PA 12 there are four common ways to get a thread: print it, tap it, melt in a metal insert or let the screw form its own thread. Each has its place. This guide compares them, shows how to choose for your loads and assembly cycles, and lists the design details that decide whether a thread holds.
The four options at a glance
A thread in a plastic part has two jobs: carry the clamping load of the screw and survive the number of times it is tightened and loosened. Nylon PA 12 is tough and machines cleanly, but it is softer than metal and it creeps under a constant load. That is why the right choice depends less on the thread itself than on how the joint is used.
| Option | How it is made | Best for | Limits |
|---|---|---|---|
| Printed thread | Modeled in CAD and printed with the part | Large, coarse threads; caps, lids and adjustment knobs; few assembly cycles | Fine and small threads come out rough; flanks wear with repeated use |
| Tapped thread | Core hole printed, thread cut with a tap after delivery | Small and medium metric threads with moderate loads | Wears if the screw is tightened often; strength limited by the nylon |
| Thread-forming screw | Plain hole printed; a screw for plastics forms its own thread | Housings and covers, quick assembly, low cost | Limited number of reassemblies; needs a suitable boss |
| Heat-set insert | Knurled brass insert pressed in with heat after delivery | Repeated assembly, higher torque, metal-to-metal thread | Needs a tool and a correctly sized hole; one more step |
| Press-in or expansion insert | Insert pressed or expanded into a hole without heat | Simple field assembly, moderate loads | Lower pull-out strength than heat-set inserts in most cases |
| Captive nut | Hexagonal pocket in the part holds a standard nut | High clamping loads, easy replacement, no tools | Needs space; the pocket must be accessible |
A rule of thumb: if the screw is tightened once or a few times, a tapped thread or a thread-forming screw is usually enough. If the joint is opened regularly, carries vibration or needs a defined torque, use a metal insert or a captive nut.
Printed threads
SLS needs no supports, so internal and external threads can be printed in any orientation. The process limits are the layer thickness and the powder surface: EOS lists 0.12 mm layers for the PA 2200 Balance process we use, and powder grains next to the sintered outline partly stick to the surface. Coarse threads print well; fine metric threads below a few millimeters lose their profile and are better tapped.
- Prefer coarse pitches and large diameters. Bottle-style caps, round or trapezoidal profiles and adjustment screws are typical printed threads.
- Add clearance between the flanks. Powder adhesion makes internal threads slightly tighter and external threads slightly fatter. The general tolerance of ±0.3 % (min ±0.3 mm) applies to threads too; see SLS tolerances and clearances.
- Chamfer the thread start. A lead-in makes engagement easy and prevents the first, weakest turn from breaking off.
- Run a tap or die through if needed. A printed thread can be cleaned with a tap after delivery, which removes sintered grains from the flanks.
- Mind the orientation. A thread whose axis is vertical in the printer is rounder than one lying flat. Print preparation chooses the orientation for the whole print job, so if a thread is critical, mention it before you order.
Tapped threads and thread-forming screws
For small and medium metric threads, the most reliable approach is to print a core hole and cut the thread afterwards. PA 12 taps cleanly and the thread flanks come out smooth. Take the core hole size from the tap or screw maker's recommendation for plastics, design it to nominal size and remember that printed holes come out slightly smaller than designed: a quick pass with a drill of the right diameter before tapping gives a defined hole.
Thread-forming screws for plastics are made for this situation: they displace the material instead of cutting it and hold well in nylon. Use the boss and hole geometry recommended by the screw maker; that recommendation exists for exactly this combination of screw and plastic.
Both options have the same weakness: every time the screw is removed and reinserted, the nylon flank loses some of its grip. For a cover that is opened once a year this does not matter. For a service hatch or a fixture that is adjusted daily, use an insert.
Heat-set inserts
Heat-set inserts are knurled brass bushings with an internal metric thread. A heated tip (a soldering iron with a matching tip or a small press) warms the insert, which is then pressed into a slightly undersized hole. The surrounding nylon softens, flows into the knurls and grooves and locks the insert against pull-out and rotation when it cools. EOS gives a melting point of 176 °C for PA 2200, so the material softens at temperatures a standard soldering station reaches easily.
Why they work well in SLS nylon
- The thread the screw sees is brass, so repeated assembly does not wear the part.
- PA 12 is a thermoplastic: it melts locally around the insert and re-solidifies, the same way it does in molded parts.
- Sintered PA 12 is dense enough to hold the knurling well, especially after blasting and polishing, which compact the surface.
How to design the hole
- Follow the insert maker's hole recommendation for thermoplastics. Insert makers publish the hole diameter, the depth and often a taper for each insert size. Use those values as the nominal CAD dimension.
- Make the hole deeper than the insert. Melted material needs somewhere to go; a hole that is too shallow pushes it out at the top.
- Give the boss enough wall around the insert. A thin boss bulges or cracks when the insert is pressed in. How much material is enough depends on the insert size and the loads.
- Keep inserts away from edges. Melting near a free edge deforms it.
- Press straight. A guide or a small press keeps the insert perpendicular; a tilted insert is the most common installation error.
Our parts are delivered without inserts: you install them after delivery, after any dyeing. Dyeing with TCN liquid dyes colors the surface layer of the nylon and adds no coating, so it does not change the hole.
Press-in inserts, expansion inserts and captive nuts
Press-in and expansion inserts need no heat, which makes them practical for assembly on site. They rely on friction and on the elasticity of the nylon, so their pull-out and torque strength is usually lower than that of a heat-set insert of the same size; check the maker's data for plastics. Helical wire thread inserts, known from repairing metal threads, can also be installed in a tapped hole in PA 12 when a durable metal thread is needed in a small space.
A captive nut is often the strongest and simplest solution: model a hexagonal pocket with a little clearance, drop in a standard nut and tighten from the other side. The clamping force is carried by the face of the nut over a large area, not by a thread in the nylon. Leave the pocket open so it can be cleaned of powder.
Design for load: what matters beyond the thread
- Creep. Nylon relaxes slowly under a constant clamping load, so a screw tightened hard into plastic loses preload over time. Use washers or a larger bearing face, avoid overtightening, and where preload matters, put metal in the load path (inserts, sleeves or a captive nut).
- Direction of the layers. EOS gives a tensile strength of 48 MPa within the layers and 42 MPa across them for PA 2200, and an elongation at break of 18 % against 4 %. A boss that is pulled along the vertical axis of the print job is weaker than one loaded in the layer plane.
- Bosses with ribs. Tie screw bosses to nearby walls with ribs instead of letting them stand free; they will resist the screw torque and the insertion of inserts much better.
- Even walls. Very thick bosses shrink more than the walls around them. A boss with a cored-out base is more accurate; see the SLS design guidelines.
Decision checklist
| If your joint... | Start with |
|---|---|
| is assembled once or a few times, low load | Tapped thread or thread-forming screw |
| is opened regularly or adjusted often | Heat-set insert |
| carries a high clamping load | Captive nut or through bolt with a nut |
| needs a large, coarse thread (cap, knob, lid) | Printed thread |
| must be assembled on site without heat | Press-in or expansion insert |
| sees vibration | Metal insert plus a thread-locking measure |
Exact hole sizes, boss walls and insert lengths depend on the insert, the screw, the loads and the number of cycles. Rather than guessing, review the design intent with the specialists at prototype.builders, who design and test such joints for prototypes and small series. Material data for PA 12 is summarized in the PA12 nylon guide, and the effect of features on the price in SLS 3D printing cost.
When the design is ready, upload it to the instant SLS calculator: holes and bosses are priced like any other geometry, and inserts add nothing to the print.
Frequently asked questions
Can you 3D print threads in SLS nylon?
Yes. SLS needs no supports, so internal and external threads can be printed in any orientation. Coarse threads print well; small, fine metric threads lose their profile and are better tapped after printing or carried by a metal insert.
Are heat-set inserts suitable for SLS PA 12 parts?
Yes. PA 12 is a thermoplastic that melts locally around a heated brass insert and locks it when it cools. Use the hole size the insert maker recommends for thermoplastics, make the hole deeper than the insert and give the boss enough wall around it.
Should I tap a thread or use an insert?
Tap the thread, or use a thread-forming screw, when the joint is assembled once or a few times. Use a heat-set insert or a captive nut when the joint is opened regularly, needs a defined torque or carries a high clamping load.
Do you install threaded inserts?
Parts are delivered without inserts. Heat-set and press-in inserts are installed after delivery, after any dyeing; dyeing does not add a coating, so it does not change the hole.
What hole size should I use for a heat-set insert in PA 12?
Use the insert maker's recommendation for thermoplastics as the nominal CAD size and test one part first. Hole size, boss wall and insert length depend on the insert and the loads, so we recommend reviewing critical joints with prototype.builders.
Why does a screw in a nylon part lose its preload?
Nylon creeps under a constant load, so the material under the screw head slowly relaxes. Washers, larger bearing faces, moderate tightening torque and metal in the load path, such as inserts or sleeves, reduce the effect.
Get an instant price
Upload STEP or STL files to the calculator and see the price of your parts in seconds: white Nylon PA 12, blasting and polishing included, optional dyeing in 61 colors, three delivery speeds. From there you send the order preview for confirmation.
Another material, an NDA or a large series? Write to us. For design help and prototype development see prototype.builders.
Get an instant price