
3D-Printed Enclosures and Housings in SLS Nylon PA 12
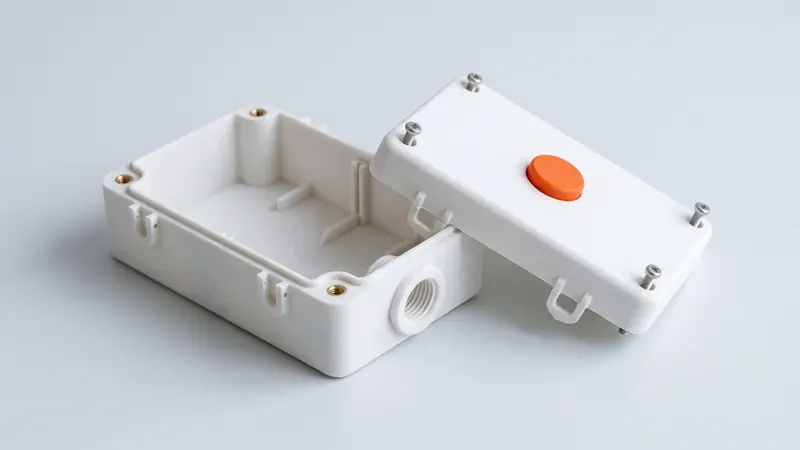
Enclosures are one of the most common parts printed in SLS nylon: housings for electronics, sensors and controllers, covers for machines, boxes for prototypes and small series. Laser-sintered PA 12 is tough, needs no supports and can integrate snap-fits, bosses, cable guides and mounting features in one part. This guide covers the design decisions that make a printed enclosure fit, close and last, and the limits you should know before you order.
Why SLS works well for enclosures
- No supports: internal ribs, bosses, clips and undercuts print without support structures.
- Tough material: PA 12 survives drops, vibration and snap-fit assembly; for PA 2200, EOS gives an elongation at break of 18 % within the layers.
- Integration: mounting tabs, cable guides, holders for light pipes, areas for labels and hinges can be part of the housing.
- Small series: no mold, so ten identical housings or ten variants cost the same effort.
- Finish and color: every part is glass-bead blasted and polished; dyeing gives a matte, even color.
Walls, ribs and flat surfaces
Walls of roughly 1.5 to 3 mm give stable, economical housings. Very thin walls flex and are fragile during handling; very thick walls add cost and shrink more as they cool. Large flat panels can bow slightly; ribs on the inside, a gentle curvature or a flange along the edge keep them flat and stiff. Keep wall thickness as uniform as possible, and round the inside corners. The SLS design guidelines list minimum features.
Lid and base: how they fit together
| Joint | Good for | Notes |
|---|---|---|
| Lip and groove | Alignment, dust protection | Give the lip clearance; see the fits below |
| Snap-fits | Tool-free assembly, few openings | Keep strain moderate, orient within the layers |
| Screws into printed bosses | Occasional opening | Self-tapping screws for plastics work for a few cycles |
| Screws into metal inserts | Frequent opening, higher clamping force | Heat-set or press-in inserts last much longer |
| Print-in-place hinge | Lids that swing open | At least 0.5 mm gap, powder must escape |
Details: snap-fit joints in SLS PA 12, threads and heat-set inserts, print-in-place hinges.
Fits and tolerances
Our design guideline for laser-sintered PA 12 is a general tolerance of ±0.3 % with a lower limit of ±0.3 mm. For a lid that slides onto a base, a total clearance of about 0.3 to 0.5 mm between the two printed parts is a common starting point. If a circuit board, display or connector must fit exactly, leave room around it and fix it with ribs, clips or screws rather than a tight pocket. More in SLS tolerances and clearances.
Bosses, standoffs and mounting the electronics
- Support bosses with ribs to the wall so they do not break off.
- Round the base of every boss and standoff.
- Use inserts for screws that will be tightened often.
- Leave clearance around boards and components; the general tolerance grows with size.
- Plan for cable routing and strain relief inside the housing.
Openings: cables, connectors, buttons and ventilation
Cable entries, connector cut-outs and button holes print well. Design them to nominal size with some clearance and check the fit with the real component. Ventilation slots and grilles are easy in SLS because no supports are needed; keep the bars thick enough to survive depowdering and blasting. Light pipes and transparent windows need another material; PA 12 is opaque.
Sealing and IP ratings: honest limits
Laser-sintered PA 12 has a slightly porous surface, and printed walls are not automatically water- or gas-tight. Sealing an enclosure depends on the joint design, gaskets, cable glands and the requirement itself. An IP rating is a property of the finished, assembled product and has to be tested on it; we do not certify IP ratings. For splash protection and dust, a well-designed lip and groove with a gasket is often enough; for immersion or pressure, test thoroughly or consider another process.
Heat inside the enclosure
Electronics produce heat, and PA 12 softens as it gets warm. EOS gives a heat deflection temperature for PA 2200 of 64 °C at 1.80 MPa and 157 °C at 0.45 MPa. Housings themselves carry little stress, but bosses holding warm components and clamped screws do. Ventilate where needed and keep loaded features away from hot spots.
Color and appearance
Printed enclosures come out matte white after glass-bead blasting and polishing in a DyeMansion Powershot DUAL, included in the price. Black is a common choice for technical housings; black and orange are in stock with the normal lead time. All 61 colors of the color catalog can be chosen in the calculator with an instant price; the colors that are not in stock take about one month longer to deliver. The dye colors the surface layer without a coating, so fits stay as designed. More in dyeing SLS parts.
Prototype first, then small series
A typical path: print one housing, check the fit of the board, connectors and lid, adjust clearances and bosses, then order the series. Because every SLS print job processes all parts the same way, a series of housings from one order is consistent. Variants, such as different cut-outs for different product versions, cost no tooling and can be ordered side by side.
Checklist for a printed enclosure
- Walls about 1.5 to 3 mm, uniform, with ribs on large flat areas.
- Lid joint chosen for how often it opens: snap-fit, screws or inserts.
- Clearance of about 0.3 to 0.5 mm in sliding fits between printed parts.
- Bosses ribbed to the walls and rounded at the base.
- Openings checked against the real components.
- Sealing requirement defined and tested on the assembly.
- Fits the 200 × 250 × 330 mm chamber, or split into parts.
For housings that are part of a product, including thermal design, sealing or certification, the specialists at prototype.builders can help with the design and the prototypes.
Frequently asked questions
Is SLS good for 3D-printed enclosures?
Yes. SLS PA 12 is tough, needs no support structures and can integrate snap-fits, screw bosses, cable guides and mounting features in one part. It suits prototypes, small series and custom housings up to the 200 × 250 × 330 mm chamber of our printer.
What wall thickness should an SLS enclosure have?
Walls of roughly 1.5 to 3 mm give stable, economical housings in PA 12. Large flat walls need ribs or a slight curvature to stay flat and stiff. The exact choice depends on size, loads and how the housing is mounted.
Are SLS enclosures waterproof?
Not automatically. Laser-sintered parts have a slightly porous surface, and sealing depends on the joint design, gaskets and the specific requirements. An IP rating must be tested on the finished assembly; we do not certify IP ratings.
How do I fasten the lid of a printed enclosure?
With snap-fits, screws into printed bosses for occasional assembly, or metal threaded inserts for repeated opening. Screws into plain printed holes are fine for a few cycles; inserts last much longer.
Can I get a printed enclosure in black?
Yes. Black and orange are in stock with the normal lead time; all 61 colors can be chosen in the calculator with an instant price, and the colors that are not in stock take about one month longer to deliver.
How big can a printed enclosure be?
Up to the 200 × 250 × 330 mm chamber of our EOS FORMIGA P 110 Velocis. The calculator checks the fit when you upload the model. Larger housings can be split into parts that are joined.
Get an instant price
Upload STEP or STL files to the calculator and see the price of your parts in seconds: white Nylon PA 12, blasting and polishing included, optional dyeing in 61 colors, three delivery speeds. From there you send the order preview for confirmation.
Another material, an NDA or a large series? Write to us. For design help and prototype development see prototype.builders.
Get an instant price